[AWS] ทำ Websocket ใน API-Gateway ผ่าน HTTP
![[AWS] ทำ Websocket ใน API-Gateway ผ่าน HTTP](https://thanapon.info/wp-content/uploads/2021/06/New-Project-1.png)
จั่วหัวเรื่องมาแบบนี้ ปัญหาที่เจอเวลาค้นหา API-Gateway Websocket Type ใน AWS ก็คือส่วนมากมีแต่การ Integrate เข้ากับ Lambda function ซึ่งเป็น Serverless ใน AWS อย่างเซงงง
แต่เราอยากใช้ Websocket ที่เรา implement แล้วใน Application ของเราแล้วนะสิ ซึ่งผมพยายามหาก็ยังไม่เจอเลย~~~~~ เลยยอมแพ้ จนสายตานั้นเหลือบไปเห็น Integration type HTTP (น้ำตาจะไหล)
โดย Concept ของวิธีนี้จริงๆมันก็คือ การ Request <=> Response หล่ะครับโดยที่ เราจะให้ API-Gateway เป็นตัวจัดการ Connection ระหว่าง client และ Backend-service แบบเวลามี Event มาจากฝั่ง Client ตัว API-Gateway ก็จะมา Trigger endpoint ที่เรากำหนดให้แล้วจะทำอะไรกับ Request body ก็แล้วแต่ Backend-service เลย
จริงๆวิธีนี้มันก็ไม่ได้ใช้ Websocket ที่เรา Implement ใน Application ของเรานะ แต่ก็ไม่เป็นไรแค่เขียน Endpoint ขึ้นมาใหม่เอง
Prerequisites
Aws api-gateway websocket connect through Http
เริ่มต้นให้ Clone repository ข้างบนนี้มาก่อนนะครับ ตัว Repository นี้ผมเขียนด้วย Nodejs นะครับใครไม่มีก็ไปโหลดมาลงก่อนเน้อ
เสร็จแล้วให้ติดตั้ง package Ngrok กับ wscat นะครับ โดยที่ Ngrok มันก็จะไปสร้าง tunnel ให้คนอื่นสามารถเรียก Application ของเราได้จากภายนอกนะครับส่วน wscat เป็น Websocket client สำหรับเชื่อมต่อกับ API-Gateway websocket type
# Install npm package
$ npm install

# Install ngrok
$ npm install -g ngrok

# Install wscat
$ npm install -g wscat
Backend Flow
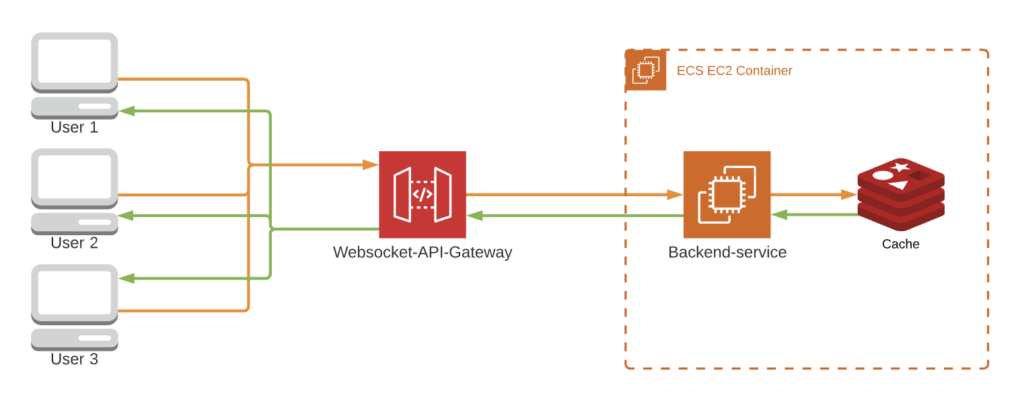
- User connect เข้ากับ API-Gateway, จากนั้น API-Gateway จะทำการ Mapping Connection-id เข้ากับ Request body แล้วส่งไปยัง Backend-service ของเรา
- เมื่อ Backend-service ของเราได้รับ Request ที่มาจาก API-Gateway เข้ามาที่ endpoint “/connect” Backend-service ของเราจะทำการ store ค่าไว้ใน global variable (ถ้าใช้จริงๆแนะนำให้ไปใช้พวก Cache service: Redis หรือ Memcache อะไรก็ว่าไปดีกว่าครับ)
- จากนั้นเมื่อ User ส่ง Message มา API-Gateway จะทำการ Route ไปที่ $default route ของเราแล้วก็ส่งมาที่ endpoint “/handle-event“
- ใน “/handle-event” จะทำการ Broadcast message ไปตาม Connection-id ที่เราได้เก็บเอาไว้ ผ่าน API-Gateway Connection URL
- หลังจากที่ User disconnect หรือ timeout ออกไป API-Gateway ก็จะส่ง event พร้อมกับ Connection-id มาที่ endpoint “/disconnect” เพื่อให้ Backend-service เรา ลบ Connection-id นั้นทิ้งไป ก็จบ…….
const awsAccessKey = process.env.AWS_ACCESS_KEY_ID
const secretAccessKey = process.env.AWS_SECRET_ACCESS_KEY
const region = process.env.AWS_REGION
const responseMessageUrl = process.env.RESPONSE_MESSAGE_URL
const apiGateway = new AWS.ApiGatewayManagementApi({
  accessKeyId: awsAccessKey,
  secretAccessKey: secretAccessKey,
  region: region,
  endpoint: responseMessageUrl,
  apiVersion: '2018-11-29'
})

app.post('/connect', (req, res) => {
  /**
   * Store connection_id in cache or database,
   * Implement your code below
   */
  const connectionId = req.body.connection_id
  connectionClient.push(connectionId)
  console.log('connectionId connected :>> ', connectionId);
  res.status(200).end()
})

app.delete('/disconnect', (req, res) => {
  /**
   * Remove connection_id from cache or database,
   * Implement your code below.
   */
  const connectionId = req.body.connection_id
  removeConnectionId(connectionId)
  console.log('connectionId disconnected :>> ', connectionId);
  res.status(200).end()
})

app.post('/handle-event', async (req, res) => {
  console.log('message :>> ', req.body)
  const responseBody = {
    body: req.body.body.message,
  }
  const promises = []
  for (const id of connectionClient) {
    const params = {
      ConnectionId: id,
      Data: JSON.stringify(responseBody)
    }
    const apiGatewayPost = apiGateway.postToConnection(params).promise()
    promises.push(apiGatewayPost)
  }
  await Promise.all(promises)
  res.status(200).send('received!')
})
Config API-Gateway ก่อน
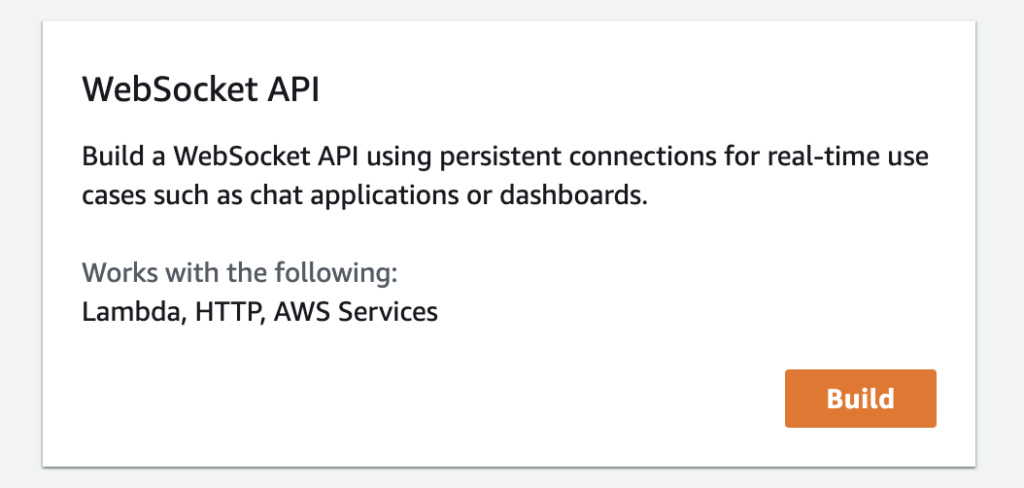
- เข้าไปที่ API-Gateway แล้วทำการสร้าง WebSocket API ก่อนนะครับ
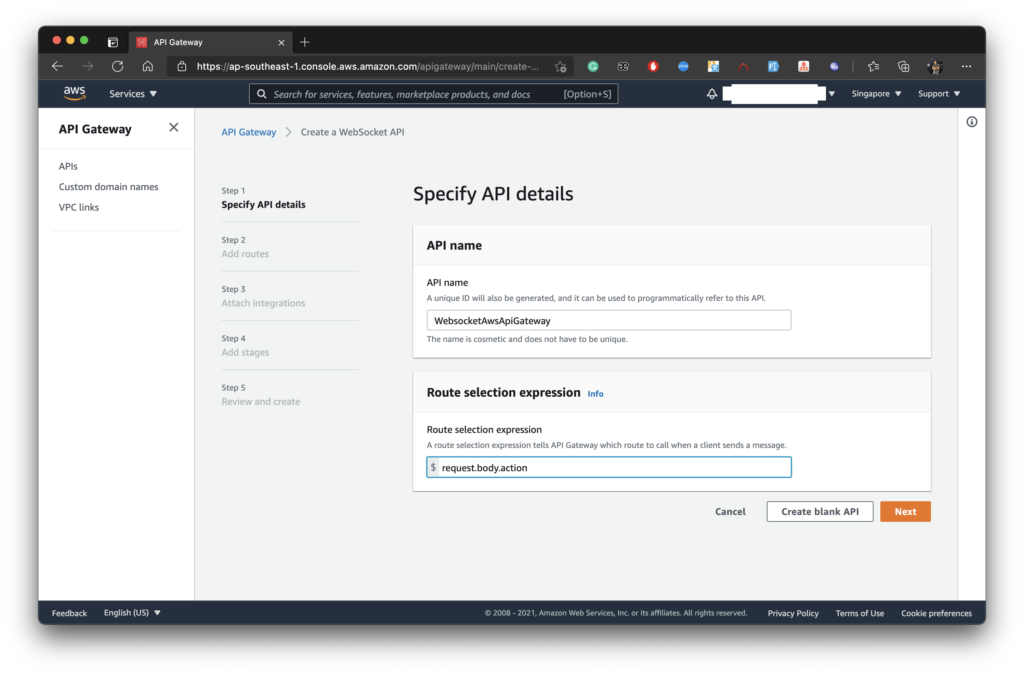
- จากนั้นเราก็จะเห็นว่ามันจะให้เราใส่ชื่อ API กับ Route selection expression
Route selection expression คือ JSON key ที่บอกให้ API-Gateway รู้ว่ามันต้องส่ง Request body เข้าไปที่ route event ไหน เช่น {“action”: “joinroom”, “message”: “test”} ถ้าส่ง body อย่างงี้มาจาก client ตัว API-Gateway ก็จะเข้าใจว่า route ที่มันจะส่งไปคือ joinroom แต่ถ้าไม่มี joinroom มันก็จะส่งเข้าไปยัง $default route
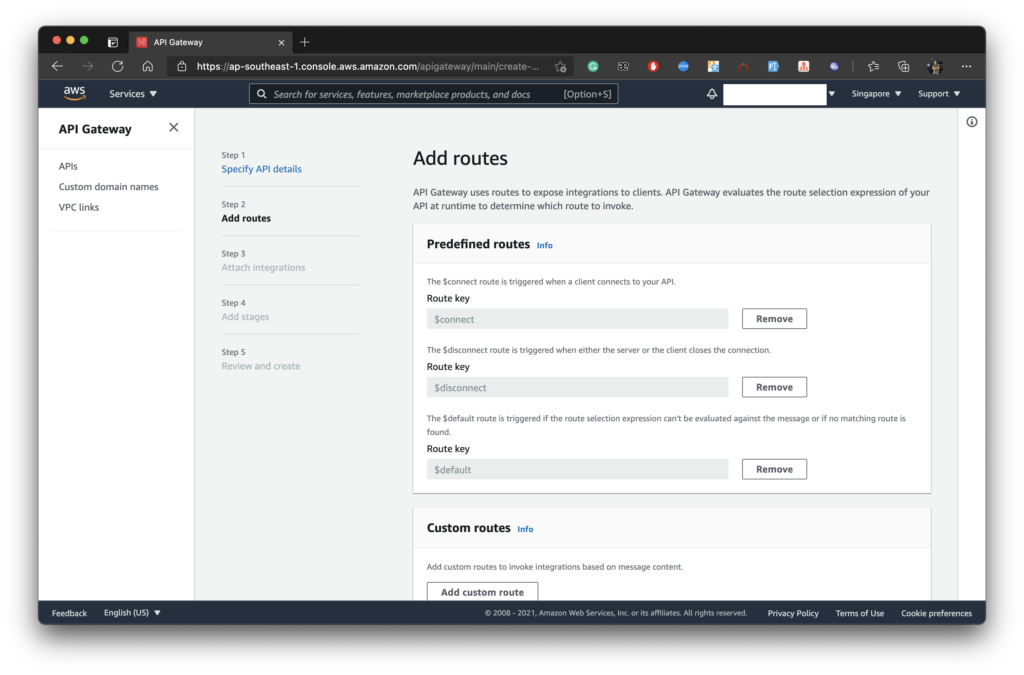
- ขั้นตอนต่อมา เราจะต้องกำหนด Route key แต่ละตัวโดยที่หลักๆแล้วจะมี $connect, $disconnect และ $default
$connect หลังจากที่ client เชื่อมต่อเข้ามายัง url แล้ว เราจะให้ API-Gateway ส่ง request ไปยัง endpoint ไหน
$disconnect ก็คือหลังจากที่ client disconnect จากตัว Gateway แล้วจะให้ไปไหน
$default ถ้าตัว routes selection expression ของเราไม่เข้าเงื่อนไขสัก event มันก็จะถูกส่งมาที่ default route นี้
ส่วน Custom routes ก็คือ route อื่นๆที่เราอยากจะ handle ซึ่งใน repo ข้างบนนี้ผมขอไม่ใช่ custom route ละกันครับ
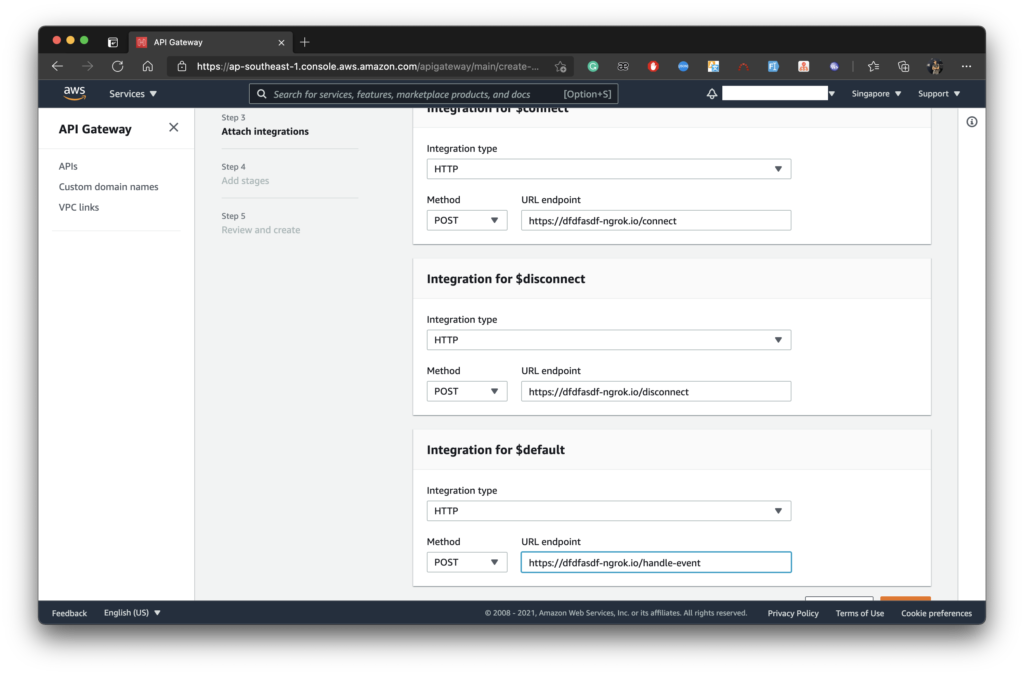
- เรียบร้อยแล้วหลังจากนั้น API-Gateway จะให้เราเลือก ประเภทของ Service ที่เราจะให้ API-Gateway เรียกมา เราก็กำหนดเป็น HTTP Type ส่วน Method กับ URL endpoint จะเป็น Endpoint ที่ Nrgok forwarding package มาให้เรานะครับ จะได้หน้าตาแบบนี้ => https://{endpoint}/{path}
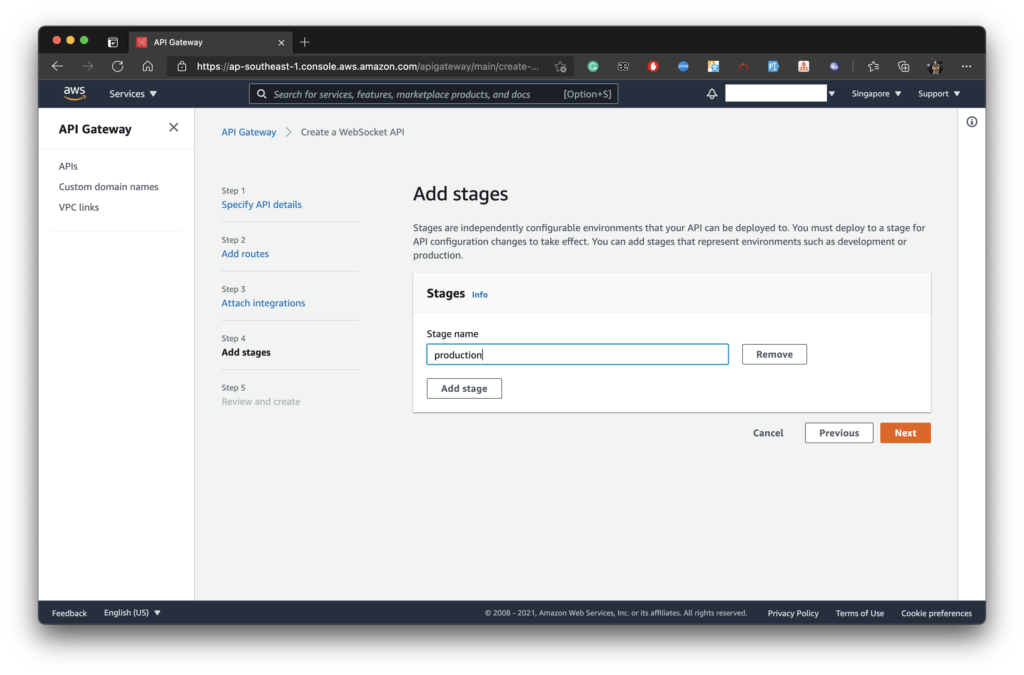
- เลือก Stage ที่จะ deploy ค่า default จะเป็น production จะเปลี่ยนเป็น dev, staging ก็แล้วแต่เราเลยครับ
- เช็ค config เสร็จแล้วก็ done/deploy เลยครับ
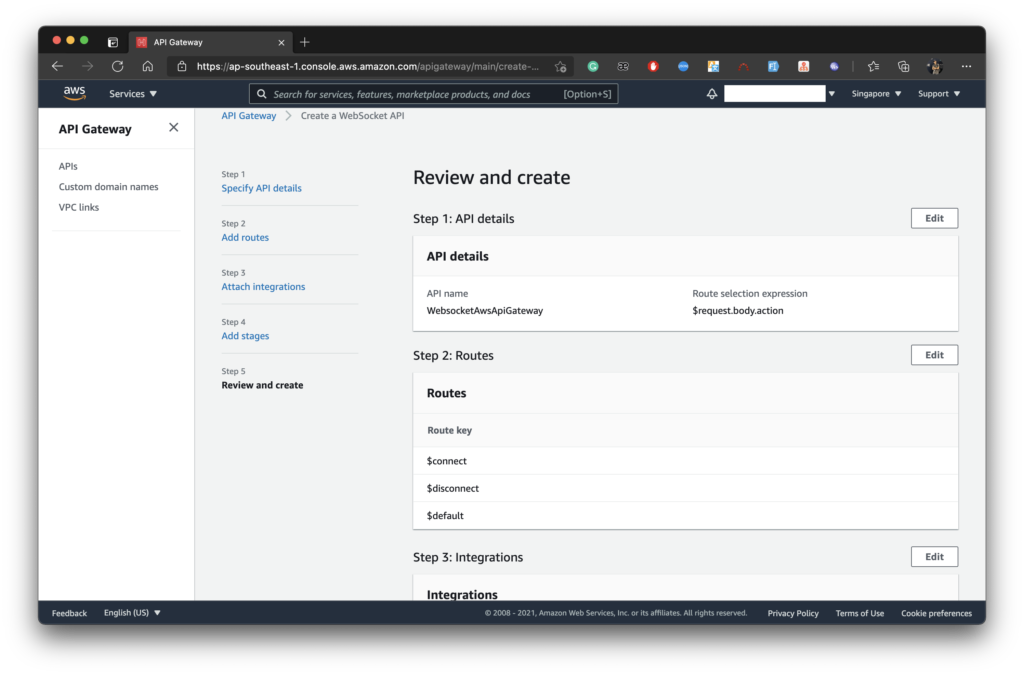
- จากภาพข้างล่างจะเห็นว่า ตรง Routes จะมี Route Selection Expression ตรงก็นี้เหมือนที่อธิบายไว้ข้างบนนะครับ จากนั้นเราจะมา mapping template ใน Integration Request กันต่อ เพื่อให้ API-Gateway ส่ง body ไปให้ Backend-service ของเรา
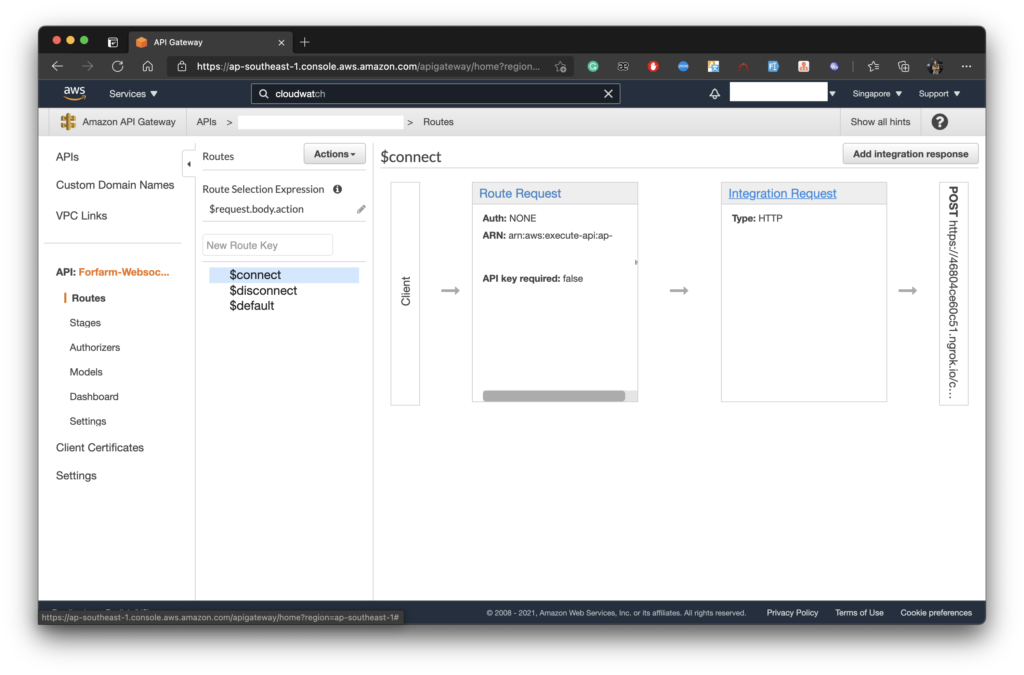
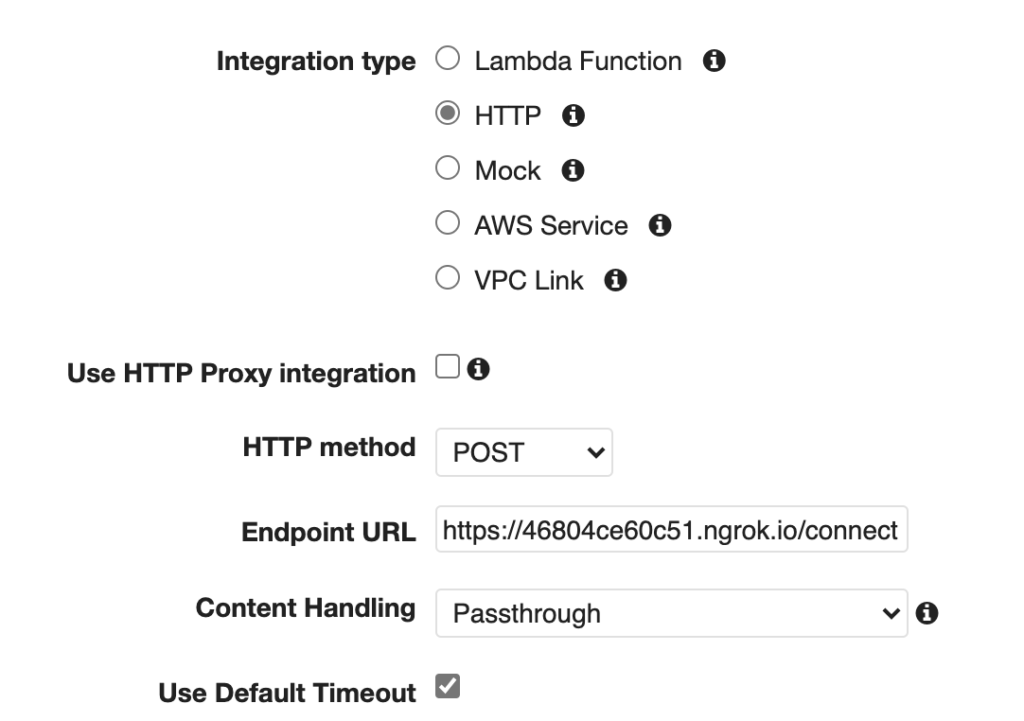
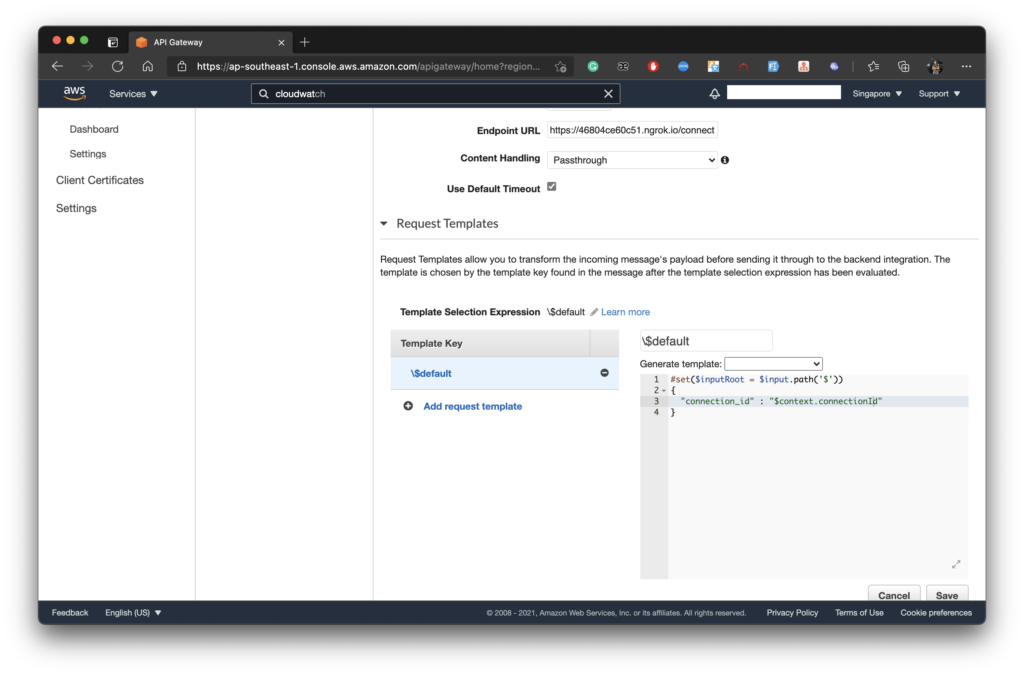
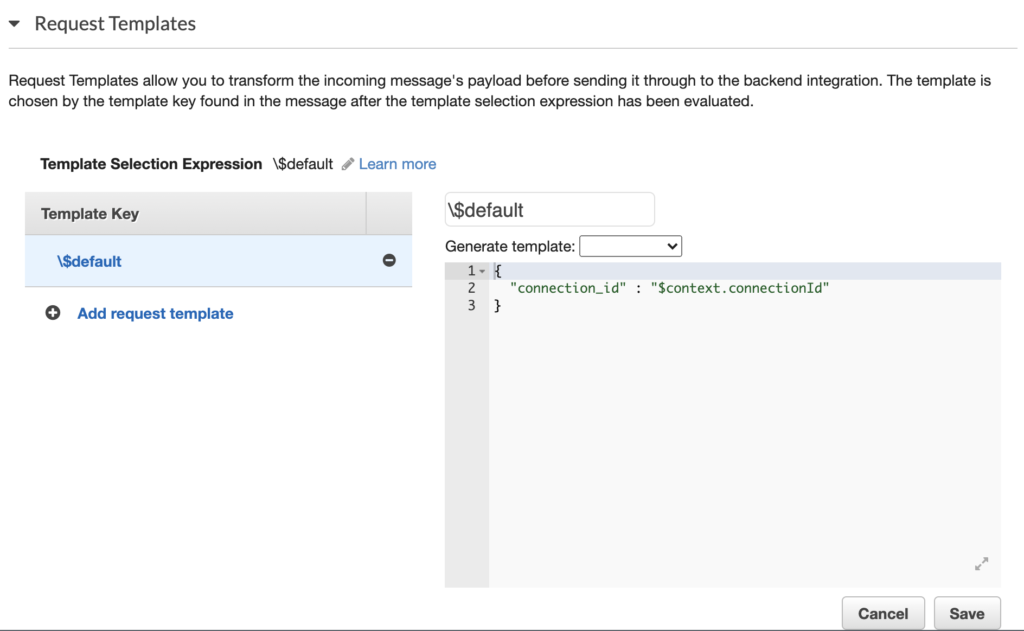
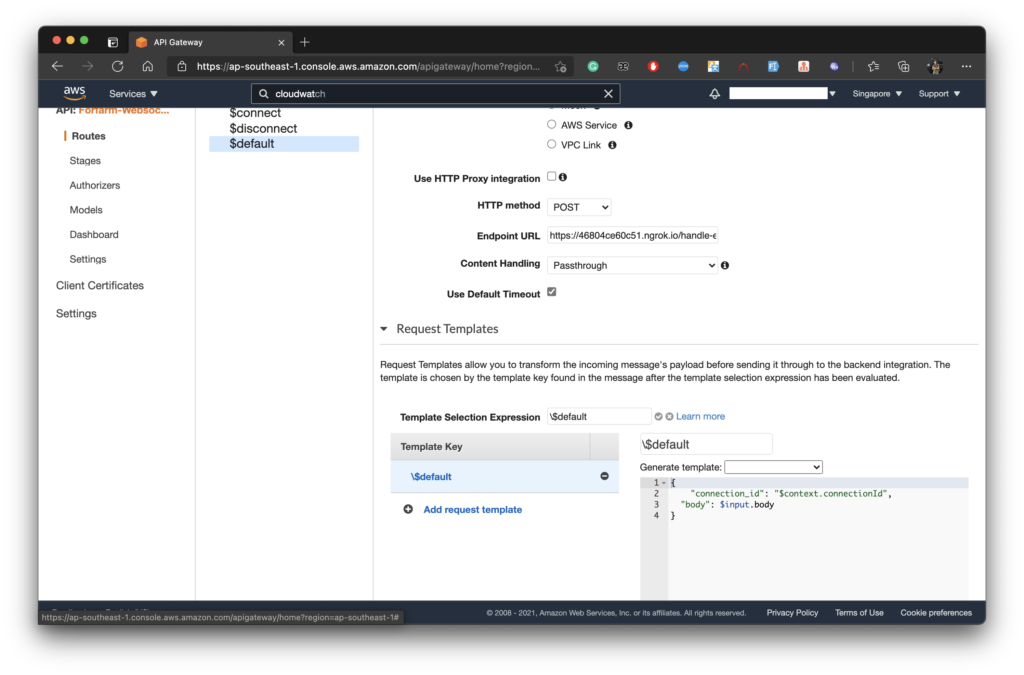
- อย่าลืม ติ๊ก Use Proxy Integration ออกด้วยนะครับ แล้วกด save จากนั้นแท็ป Request Templates ก็จะโผล่ขึ้นมาให้เราเพิ่ม Template Selection Expression เป็น \$default นะครับต้องมี ( \ ) slash ด้วยนะครับตามรูปเลย
{
  "connection_id" : "$context.connectionId"
}
connectionId คือ unique id ที่ทาง API-Gateway จะ generate ออกมาให้สำหรับ push message ไปให้ client ผ่าน API-Gateway
API Gateway WebSocket API mapping template reference – Amazon API Gateway
!!! อย่าลืม Config Integration Request กับ $disconnect ด้วยนะครับ
- แล้วก็กด Add integration response ด้วย เพื่อที่เราจะสามารถรับ Response body ที่มาจาก backend ได้
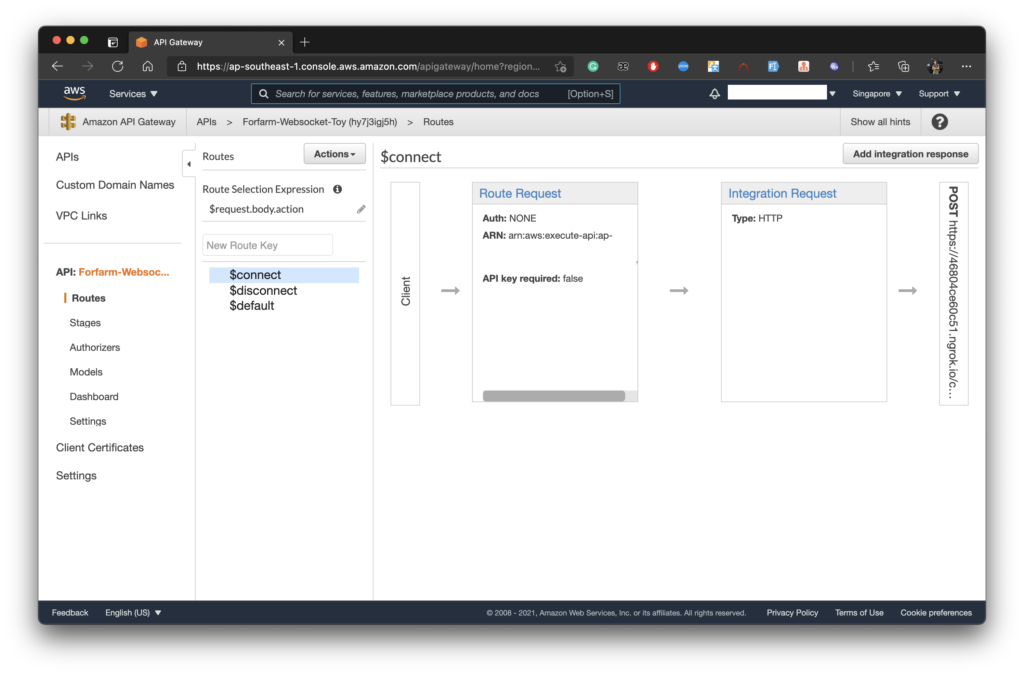
- หลังจากกด Add integration response ก็จะได้หน้าตาแบบนี้ กดเข้าไปที่ Integration Response ด้วย เพื่อใส่ค่า default key
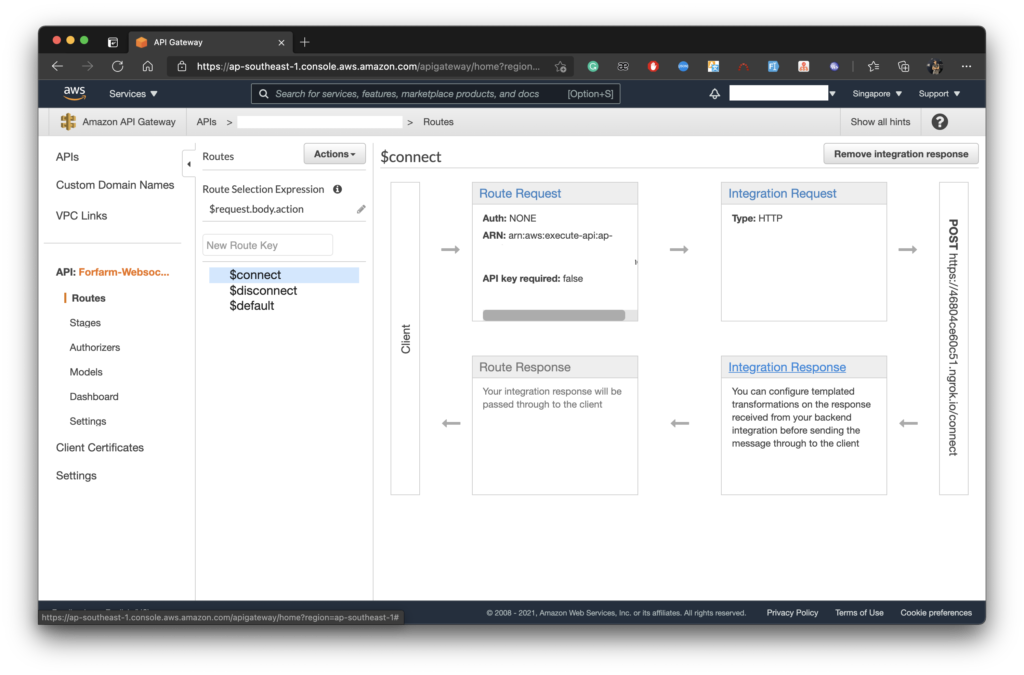
- เพิ่ม Response key เป็น $default ตามรูปนะครับ (ไม่ต้องกำหนด spec อะไรของมัน)
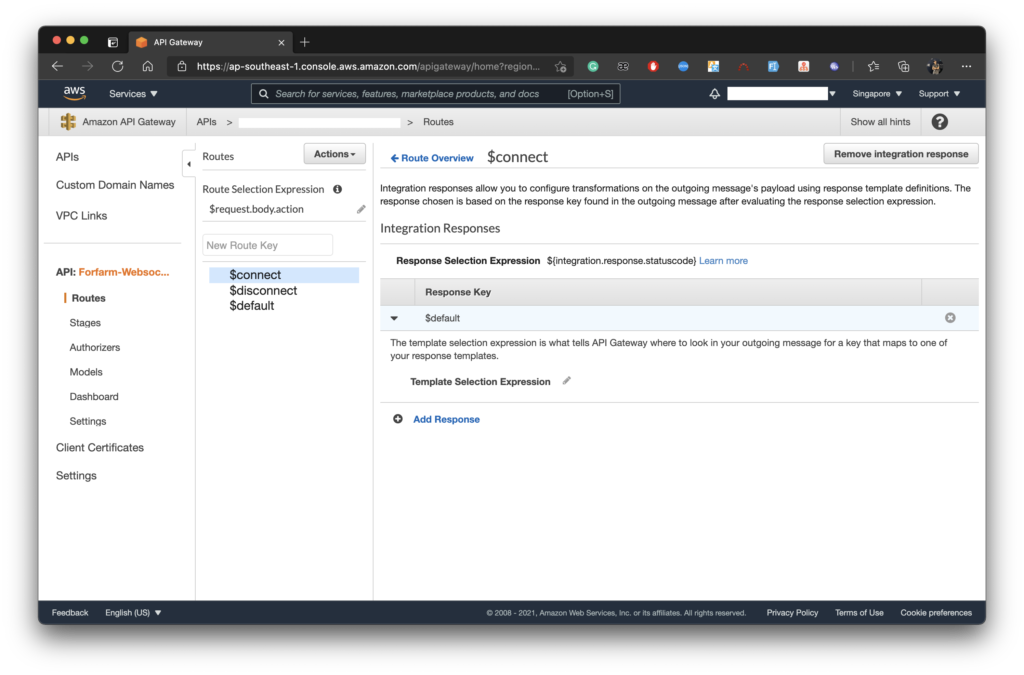
- ส่วน event -> $disconnect ก็ทำเหมือนกันกับ $connect นะครับ
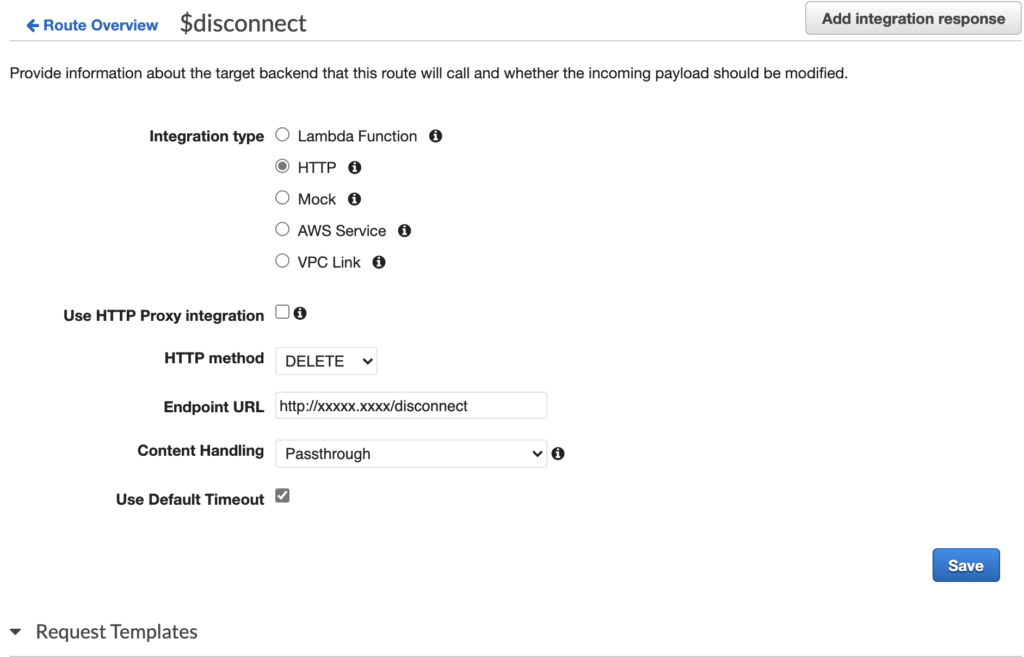
- แล้วก็เพิ่ม Request Templates ให้กับ event -> $disconnect ด้วย
- กลับมาที่ event -> $default
- Integration type: HTTP
- HTTP method: POST
- Endpoint: http://{มาจาก ngrok}/handle-event
- อย่าลืมติ๊ก Use HTTP Proxy integration ออกนะครับ
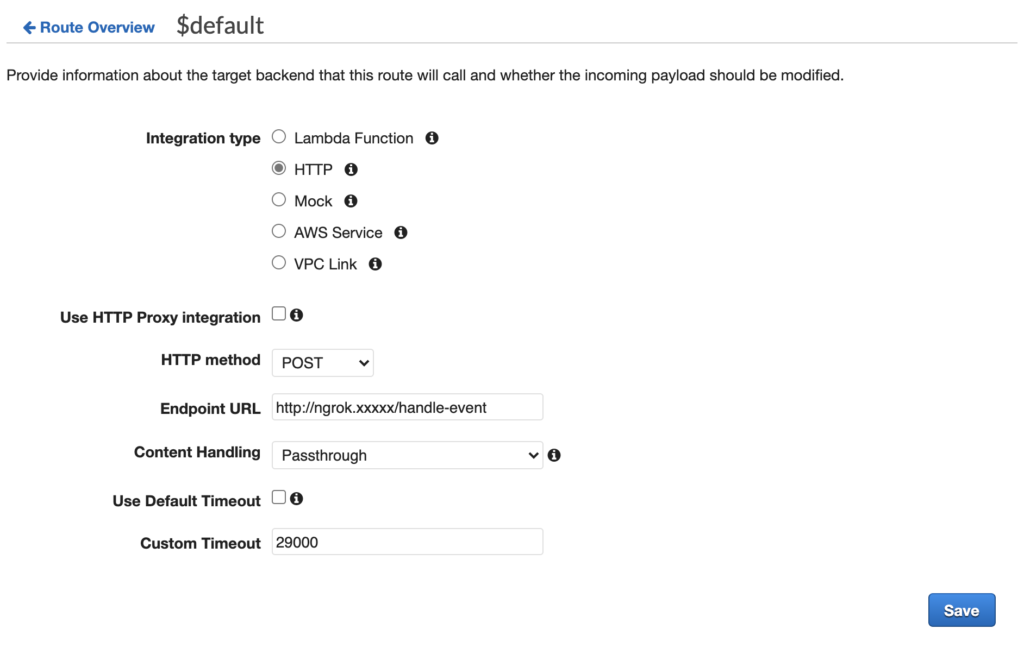
- เพิ่ม Request Templates ด้วยงั้นตัว backend service ของเราจะรับ Request body ไม่ได้
กำหนด Template selection expression กับ Template key เป็น “\$default” ต้องมี slash ด้วยนะครับ
{
  "connection_id" : "$context.connectionId",
  "body" : $input.body
}
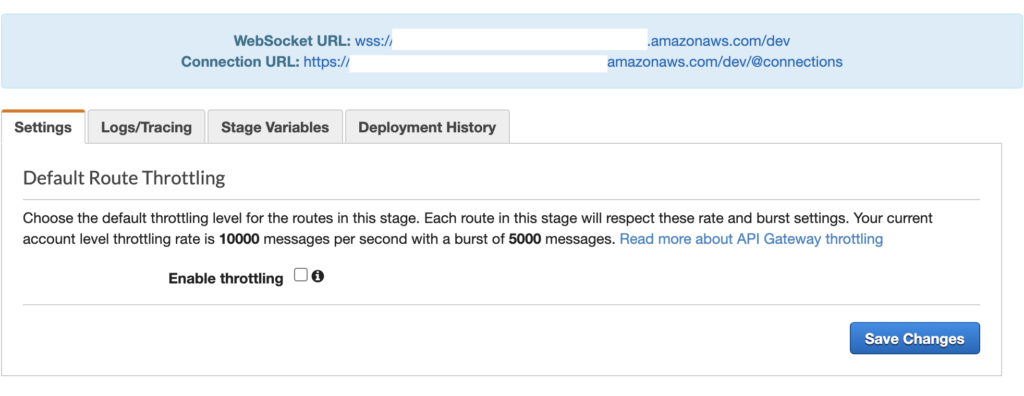
- เสร็จเรียบร้อยอย่าลืม Deploy API กันนะครับ จด Connection URL ไว้ด้วยนะครับเดี๋ยวเอาไปใช้ต่อ

Testing
ทดสอบโดยการรัน Nodejs Project ของเราก่อนเลย อย่าลืมรัน Ngrok กับ Nodejs ไว้ด้วยนะครับ
****อย่าลืมแก้ env.local ด้วยนะครับ
- RESPONSE_MESSAGE_URL: ใส่ Connection URL จาก API-Gateway เข้าไปเลยนะครับ ไม่ต้องใส่ @connections นะครับ
RESPONSE_MESSAGE_URL=https://xxxxx.execute-api.{region}.amazonaws.com/xxxx
AWS_ACCESS_KEY_ID={xxxxxxxx}
AWS_SECRET_ACCESS_KEY={xxxxxxxxxx}
AWS_REGION={region}

# Client configuration
WEB_SOCKET_URL=wss://xxxxxxxxx.execute-api.{region}.amazonaws.com/xxx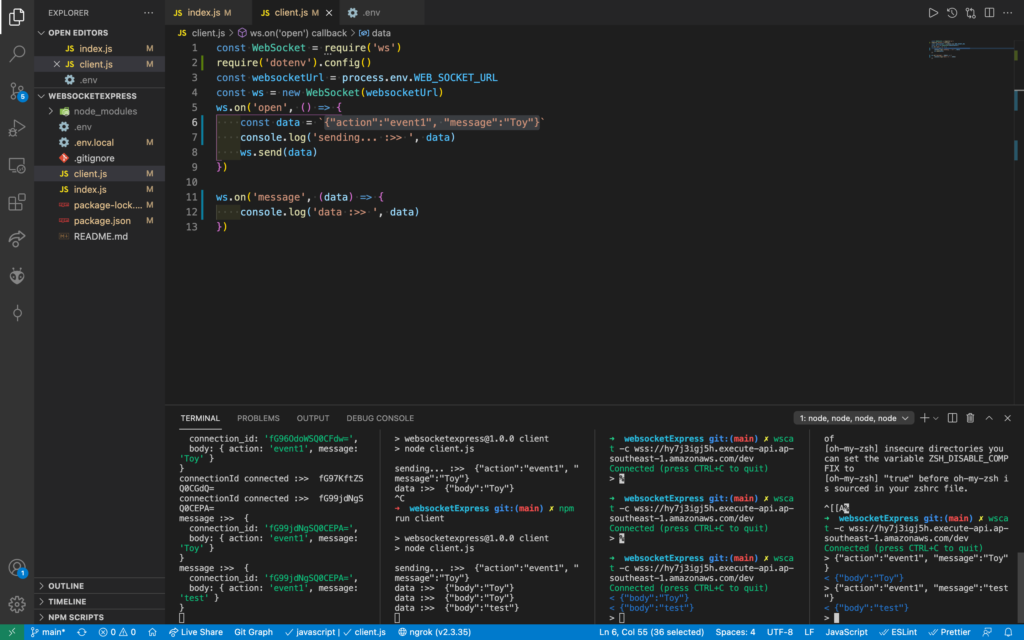
Aws api-gateway websocket connect through Http
A WebSocket API in API Gateway is a collection of WebSocket routes that are integrated with backend HTTP endpoints, Lambda functions, or other AWS services. You can use API Gateway features to help you with all aspects of the API lifecycle, from creation through monitoring your production APIs.
ngrok provides a real-time web UI where you can introspect all HTTP traffic running over your tunnels. Replay any request against your tunnel with one click.
https://github.com/websockets/wscat

